Reports
The available predefined reports in the system are accessed through the Shared Reports menu item The Shared Reports screen displays with a Report Groups drop down for navigation to other reports, a Revert button to revert reports to default settings, and an Add button for adding reports, if necessary.

Download the PDF job aid here –> Shared Reports Job Aid.
You can add a new report to the Shared reports group in Manager Self Service. A Shared report will be available to other users. You can watch the video below on how to add a new report.
To add a new report:
Click on the Shared Report menu item.

Click the Add button.
Type a new title for the report.

Type a description of the report in the Hint field.
Type the name of the report group you want to add the report to or type a different name to create a new report group.
From the drop-down, choose a report template.
Click OK.
The new report will appear in the reports list, click on it to open and customize.

On this screen, change the name of the report, and the remainder of the filters to change what information you want to report on.
Choose a default destination for your report, email or to your screen
If needed, create a report schedule to automatically create this report on a regular schedule.
Watch the video below to get an understanding about Private Reports.
You can add a new private report by following the steps shown in the video. Note: Private reports are only available to you and not to other users.
Below are the steps to add a new private report.
Click the Private Reports menu item.

From the drop-down, choose a base report upon which your private report will originate.
Change the report title, add a hint and select or create a report group.

From the drop-down, choose a report template and click OK.
Click on the new report’s name to open it.
Choose a default destination — email or to your screen — for the report.

If needed, create a report schedule to automatically create this report on a regular schedule.
Click Run Report.
Confirm if you want this report emailed or a document to your computer.
The Prior Execution field will populate with each instance of the report. You can also regenerate a previously-run report from the list.
Download the PDF job aid here –> Private Reports Job Aid.
Reports can be scheduled to run automatically base on a schedule. In addition, the report can be delivered to a recipient’s email address when the scheduled autorun occurs.
To schedule a report to autorun with email delivery:
Locate the report to be scheduled for autorun using the report tab drop-down list located in the selected report menu item.

Select the report to be schedule in the report tab.

Click the down arrow in the Auto Run Schedule field of your selected report and click Add New Schedule.

Select the format for the report in the Attachment Type drop-down list.

Enter the time of day you want the report to run and enable the check box for each day you want the report to run.

Enter the email address for each recipient you want to receive the report in the Recipients field, separating entries with a semicolon. Type a subject for the email in the Subject Line field and add a message to the recipients in the Content Message field if needed.

The scheduled time and days for the autorun will appear in the Auto Run Schedule report field.

Removing an Auto Run Schedule
If you need to cancel the autorun, select the down arrow in the Auto Run Schedule header and select Remove Existing Schedules.

Enable the Confirm Removal of all Schedules check box in the Clear report Schedules window.

Download the PDF job aid here –> Scheduling Email Delivery of a Report Job Aid.
You can adjust the workgroup selections for a report to filter the set of employees presented. To change a workgroup for a report:
Click the Shared Reports (or Private Reports) menu item in Manager Self Service.

Click the reports drop-down list in the Shared Reports page and select a report group.
Click the report you want to change the workgroup for.

Click the property blue folder icon in the Workgroups field and click Select Workgroups
In the property window, select the workgroup you would like to change.

Use the workgroup level drop-down lists to change the workgroup.
Click the Update button to save your changes.
Click OK.
Your new workgroup will appear beneath the property in the report page icon
When running a report in Manager Self Service, you have the option to review the report on your computer screen or email the report to the recipients you select. You also have the option to receive the report in Adobe Reader (PDF) or Microsoft Excel (XMLSS) format. To run a report:
Select the report you would like to run in the report list.

Select the report group from the report group drop-down list.
Click the report you want to run.
Click the Run Report button.

Select your format and destination in the Build Report window.

Click OK.
The report progress will appear in the bottom of the screen.

Confirm format and destination in the Preview Report window.

Click OK.
Each report has its own set of properties that determine the content and structure of the report. The scope of the report can be narrowed using the folder menu filters on the report page. It is recommended that you make a copy of the report you intend to modify rather than making changes to an existing report. Modifications will affect all users who have access to the report.

Click each filter option to learn more…
Report Fields
To modify the fields of employees’ personal information displayed in the report, click the Fields folder button and click Fields.

Enable the check boxes in the Select Filter window to select the employee details you want to appear in the report.

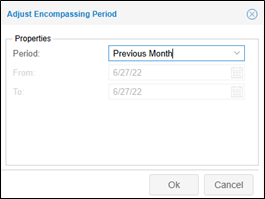
Encompassing Period
To establish the date range of your report, click the Period folder button and click Select Period.

Select from the preconfigured options available in the Adjust Encompassing Period window or set a custom period by selecting Custom in the Period field and entering dates in the From and To fields.

Employees Included
To select a group of employees to include based on the employee's work-related status, such as absent, without a schedule or sctive, click the Filter folder button and click Select Filter.

Select a work-related status filter to apply to the report.

Workgroup Included
To select a group of employees based on a specific workgroup, click the Workgroups folder button and click Select Workgroups.

Select the workgroup level to define the workgroup you want to view in your report in the Define Workgroup Sets window. Click the Updatebutton to save your selections.

You can generate a terminated employees report for specificd employees or workgroups within a specific period.
Expand Reports menu group and click Shared Reports.

Click the first drop-down arrow and select a report group to locate the Time Card Report to open up properties of the time card report.

On the Time Card Report page, click the drop-down arrow for the Filter section and choose Select Filter. The Select Filter dialog is displayed.

Select Terminated Employees in the Filter drop-down list. Then click OK.

Terminated Employees is displayed in the Filter section.

On the Time Card Report page, click the drop-down arrow for the Period section and choose Select Period. The Adjusting Encompassing Period dialog is displayed.

Select any period needed, for example, Previous Period. Or you can customize the date range by selecting Custom in the Period field and specify the start date and end date in the From and To fields. Click Ok.


The selected period is displayed in the Period section.

Click Run Report to generate a time card report.

In the Build Report dialog, select the report format (Adobe Reader (PDF) or Microsoft Excel (XMLSS)) in the Format field and specify how to obtain the report (Screen or Email) in the Destination field. If Email is selected in the Destination field, specify the email address in the available Recipents field. Click OK.

In the Preview Report dialog, verify the report properties. Click OK.

The time card report for terminated employees is exported to PDF or Excel based on your selected destination. You can access employee’s time and attendance information when they were hired.


Download the PDF job aid here –> Terminated Employees Report Job Aid.