Schedule Template
Mini Badges
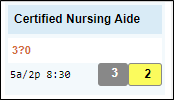
Mini badges appear in the calendar ribbon above the schedule template in Visual Scheduling.

| Dot/Badge Color | Description |
|---|---|
| Yellow | Indicates there are open schedules for that day. |
| Red | Appears when an employee is scheduled for that day to work in the workgroup set matching the master template and position, but their home workgroup does not match or they do not match the assigned audience. This can also display if an employee was selected when extended reach was enabled and later disabled. Note: The red mini badge in the calendar ribbopn does not have the same meaning as the red badge in the Visual Scheduling dashboard, which indicates an over assigned status of a coverage schedule. |
| Black | Indicates there are unaddressed call-off request for the day. |
| Orange | Indicates there are unaddressed pickup requests for the day. |
| Purple | Indicates there are unaddressed schedule drop requests. |
Download the PDF job aid here–> Icons and Badges Job Aid.
Visual Scheduling Template Icons
Click to view the table of icons that can appear in a schedule template in Visual Scheduling.
| Icon | Location in Visual Scheduling | Description |
|---|---|---|
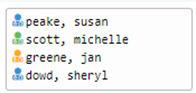 | This employee icon can appear in various colors. The color of the icon can be assigned to indicate a specific audience during template configuration. For example, the color may indicate employees who have absences, a specific pay class, seniority, are approaching overtime,etc. Colors are part of the global audience definition. | |
 | This icon is displayed in the schedule template when an employee assigned to a coverage schedule through extended reach remains assigned to the schedule after the extended reach workgroup is deactivated. This employee status is indicated at three levels in the schedule template: next to the employee's name listed in the coverage schedule, in the associated work position header for the coverage schedule and on the date of the coverage schedule as a mini red badge in the calendar ribbon. | |
 | This icon indicates an employee has been assigned to the coverage schedule through extended reach and is not a regular employee (as defined in the Encompasses tab) | |
 | The two yellow arrows icon indicates this schedule is transfer from home workgroup assignment. | |
 | This icon is displated when too few hours have been assigned to a coverage schedule. This icon only appears when using coverage budgets in your database. | |
 | This icon indicates an employee assigned to a coverage schedule has his/her availability set to **Unavailable** during the scheduled time. This icon is also displayed next to the work position if any of the coverage schedules for that position contain emplpoyees with their availability set to Unavailable. 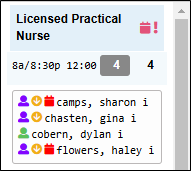 | |
 | This icon is displated when there are not enough employees assigned to a coverage schedule. This icon only appears when using coverage budgets. | |
 | Indicates the workgroup for the coverage schedule has not been defined. Click the coverage schedules properties to adjust the workgroup assignments. | |
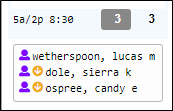
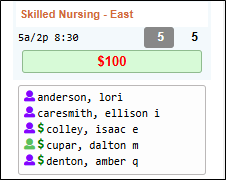 | Indicates employees assigned to a coverage schedule who will receive the incentive added to the schedule.
Employees assigned to a coverage schedule offering an incentive who do not display the | |
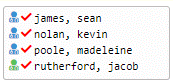  | This icon indicates employees who have **NOT** yet confirmed their work schedules. A checkmark next to a work schedule assignment box indicates the schedule requires confirmation and has employees who have **NOT** yet confirmed their schedule. |
The Extended Labor Pool property of a work position defines other positions that can be added to the candidate list for that work position’s coverage schedule. Each work position can include an extended labor pool where additional workgroups that have qualified positions for that work position can be assigned.
To activate the extended labor pool when searching for additional candidates for a coverage schedule:
- Click the My Filter Set drop-down list in the Candidates panel and select Customize.

- Click the Add Filter button in the Manage Candidates Filter Sets panel.

- Select Extended Work Position Labor Pool from the Filter drop-down list in the Add Candidate Eligibility Filter window.


- To activate the extended labor pool filter, click the Enable column checkbox, if it does not have a check mark, and click the on/off state field of the filter to activate the drop-down list.
- Select On from the drop-down list.
See Activating the Extended Labor Pool for details.
Schedule templates in Visual Scheduling are divided into stages that define the scheduling workflow. Each stage of the template indicates who can interact with schedules.
Schedule templates in Visual Scheduling are divided into stages that define the scheduling workflow. To advance a schedule template to the next stage:
- Click the Stage drop-down menu in the upper-right corner of the schedule view.
- Click on the desired stage.

- Click the Suspend Sending Messages option (if needed). This will stop notifications that alert your employees of the stage advancement from being sent out.

- Click OK.
Notes:
- Advancing the stage of your schedule may change your employee’s ability to perform actions toward work schedules (pick up schedules, trade schedules, etc.).
- The names of your schedule stage options may be different than what is shown in the video, as these options are based on your organization’s preferences.
- The stage of your schedule will automatically advance to the next stage in the scheduling lifecycle based on the date ranges established for each stage in the scheduling cycle.
See Advancing Schedule Template Stages for details.
Schedule templates are created for a specific work location (facility, floor or department) defined in the Encompasses workgroup definition. If you have multiple work locations that can share employees as needed, you can apply Extended Reach to bring eligible employees from other locations into the candidate list for a coverage schedule in your template. Extended reach employees who are assigned to the coverage schedule will see a schedule transfer in their time card for that shift.
To use extended reach, it must first be added in the template properties. When extended reach has been added to the schedule template’s properties, the Reach drop-down list will be visible in the schedule template page.
- Click the Reach button.

- Click on the Workgroup set for the additional employees that you would like to include in your schedule
- Enable the Extend Candidate Search, Extend Open Schedules and/or Extend Trade Participants options.

- Find additional candidates to fill open shifts (Note: You will need to enable the Extended Reach Candidate List option as well. To learn more about this option, read this article.
- Allow additional employees to pick up open shifts
- Allow other employees to participate in schedule trades
- Click OK.
See Using Extended Reach for details.
Schedule template viewing options let you adjust how much detail you will see in your schedule template. Work positions, schedule times, total schedule hours and employees assigned to a coverage schedule can all be hidden from your template view.
In the View drop-down list:
- Click the Show Assignments menu item to view the names of the employees assigned to the schedules in the template.

- Click the Show Schedules menu item to view the schedules times and total scheduled hours in the template.

- Click the Positions menu item and select a position to view only the schedules for that position in the template or select All to view all of the schedules.

- Click the Members menu item and select an audience to view the members of that audience in the audience panel.

See Schedule Template Viewing Options for details.
Work positions are added to a master template during configuration of your system based on your ideal schedule. If you find that you need to add one of your configured work positions to a day that it is not currently appearing in your schedule, it can be added within the schedule template. To add a work position:
- Click the Plus icon (+) in the day cell of your schedule template.

- Click the Add Position button to open the Add Position to Schedule Template window.
- Select the work position you want to add.

- Enable the Build Coverage from Existing Work Schedules check box to bring in schedules that match the date, work position workgroup and the encompasses workgroup. If the work position does not have any work schedules associated with it or you do not enable this checkbox, only the position name will appear in the schedule template.
- Click OK.
See Adding a Work Position for details.
The Actions menu for a Visual Scheduling work position can be used to:
- Remove employees assigned to the coverage schedules for the work position
- Remove the work position from the schedule template (see the job aid Adding a Work Position for information about this menu item)
- Show the schedule in a roster view
- Show external matching schedules
- Recalculate coverage schedule numbers
To view the Actions menu, click the Work Position name in the schedule template and click the Actions menu item.
See Work Position Actions for details.
Work position filter buttons can be used to filter the schedule template display in Visual Scheduling to show only the selected work position(s). Only managed worked positions in the schedule template can be have a filter button. Work positions are selected as managed work position in the basic template properties.

The abbreviations of work positions are used as filter button labels.


Note Work Position filter buttons are available in the Full and Weekly View Mode, but NOT available in Accordion View Mode. These modes are selected in the Basic properties of the schedule template.

To add the work position filter buttons:
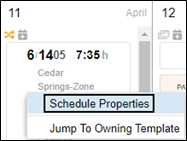
Click the Operations drop-down menu in the template header and select Properties to open the template properties panel.

Click the Advanced tab in the template properties panel and enable the Work Position Selector Buttons check box.

Click Managed Work Positions on the Basic tab. The Managed Work Positions dialog is displayed.

Enable the check boxes for the work positions you want add a filter button for in the schedule template.

Click the OK button.
Return to the Visual Scheduling dashboard and access the template again to refresh the header with the filter buttons.

When none of the filter buttons are selected, all of the work positions will be displayed in the template.

When one or more filter buttons are selected, only those work positions will be displayed in the template.

Download the printable version instructions Work Position Filter Button for details.
Schedule template user roles define the extent to which users can interact with the template. A role is assigned to specific system users in the template’s properties in order to grant them access to the template. A user must have a user account established in your system to be selected as a template operator. If the user does not appear in your Operator drop-down list, add the user account in your account management menu item in MSS.
To add an operator to your schedule template:
- Open the Template Properties panel by selecting Properties from the Operations drop-down list in the Visual Scheduling template.

- Click the Operators tab in the template properties panel.

- Click Add to open the Add Schedule Template Operator window.
In the Add Schedule Template Operator window, you will define the role for the selected operator.
Select the operator you want to add to the template from the Operator drop-down menu (in this example, Mary Smith has been selected).

Select the role for the operator from the Role drop-down list (in this example, the role of Assistant Scheduler has been selected).
Operator roles were defined as part of your Visual Scheduling implementation.
Select the specific group of employees you want the operator to access in the schedule template.
When making an Access selection, be sure to use the same access selection assigned to the other Operators of this schedule template. If you are not sure which Access has been assigned to your template, contact your implementer or a support technician.

- Click OK to close the Add Schedule Template Operator window.
The new operator will appear in the Operations tab with the role and access information you have assigned. To adjust a role or access for an operator or remove an operator, click the Pencil icon next to the operator’s name in the Operators tab. 
Adjust a role or access for an operator using the Role and Access drop-down lists or remove an operator by enabling the Remove this Operator check box to remove the operator.
Download the printable version instructions Adding a User to a Visual Scheduling Template for details.