Dashboard
Dashboard Badges
The Visual Scheduling dashboard is your access point for schedule templates and provides an overview of schedule activity. For each template listed in the dashboard, a timeline for the duration of the schedule is displayed with a color-coded bar and badges. Each badge represents a scheduling issue requiring attention for that template.

| Color | Indication | Description |
|---|---|---|
| Yellow | Under-filled Position | This badge indicates a coverage schedule does not have the required number of employees assigned to it. This is also indicated with a yellow-highlighted box with the number of employees needed in the schedule template.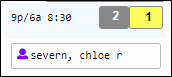 |
| Red | Over Assigned Position | This badge indicates the coverage schedule has too many employees assigned. This is also indicated with an orange-highlighted box with the number of employees overscheduled in the schedule template. Note: Although the red badge color does not match the orange highlighted box in the schedule template, both are indicating the coverage schedule has been over assigned. 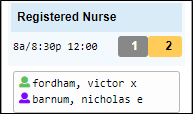 |
| Blue | No Shows | This badge indicates an absence without a call off. This is also indicated with a blue bar in the schedule template.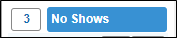 |
| Black | Call Offs | This badge indicates an emplouee has sent a message to the manager that he/she willnot be working the scheudled shift. This is also indicated with a black bar in the schedule template.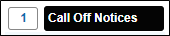 |
| Orange | Pending Pickups | This badge indicates an employee has requested to pick up an open schedule. This is also indicated with an orange bar in the schedule template.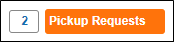 |
| Purple | Pending Drop | This badge indicates an employee is requesting to drop a schedule. This is also indicated with a purple bar in the schedule template.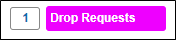 |
| White | Out of Target coverage number | This badge indicates an out of target coverage number in schedule with coverage budgets. This badge is exculsive to using a census count for staffing work positions. To view coverage details, click the Show Coverage Chart menu item for the coverage schedule in the template.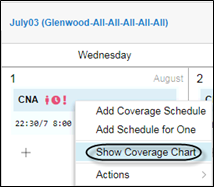 |
Download the PDF job aid here–> Icons and Badges Job Aid.
To create a new schedule template for the next scheduling period, you can roll your master template forward. When the master template is rolled forward, existing roster schedules are pulled into the new template. You can begin work on the next scheduling period having only to fill gaps in coverage.
To roll a master template forward:
- Click on the name of the schedule that needs to be rolled forward.
- Click Roll Template Forward.

- Select the desired Master Template.
- Click OK.

Notes:
- The dates that are entered in the Starting Date and Ending Date fields are populated based on the duration of the schedule that you selected. Most of the time there won’t be a need to adjust them.
- You will only want to enable the Start a New Series setting if you would like the newly created schedule to be disassociated from your master templates. This is only to be used in very unique situations.
See Rolling a Schedule Template Forward for details.
The Visual Scheduling dashboard is your access point for schedule templates and provides an overview of schedule activity. The Statistics panel expands beneath the dashboard and displays statistical information for open schedules, trades and filled positons.


See Dashboard Statistics for details.
The Visual Scheduling dashboard is your access point for schedule templates and provides an overview of schedule activity. For each template listed in the dashboard, a timeline for the duration of the schedule is displayed with a color coded bar and badges. Template bar charts represent the schedule timeframe with designations for schedule interaction and alerts for resolving scheduling issues.

The colors of the template bar indicate the status of the schedule in relation to timeframe for going live, when employees begin recording worked hours.

- Red - Indicates that there are issues that need to be addressed and the template is within the range of days before the template live date. This is your indication that the scheduling issues should be addressed immediately, in order to avoid staffing issues.
- Yellow - Indicates that there are issues that need to be addressed but the template has not reached the threshold of days before the live date that will prompt the bar color to change to red.
- Green - Indicates there are no issues, all positions are currently filled.
See Dashboard Template Bar Charts for details.
The Visual Scheduling dashboard is your access point for schedule templates and provides an overview of schedule activity. The dashboard toolbar has options for adjusting the view of the template list in the dashboard and adding new templates:
- Click the New button to add a new template frame for creating a new schedule.
- Use the Active drop-down list to change the dashboard view to display only active templates, only inactive templates or all templates.
- Select the month you want to view templates for from the month drop-down list.
- If you have multiple groups of templates, you can select which group to view in the Group Drop-down list.
- Dashboard viewing preferences can be selected by clicking the Preferences button.

See Dashboard Toolbar for details.